Showing posts with label Windows 2008. Show all posts

How to install Active Directory Users and Computers for Windows 2008 and R2


Active Directory Users and Computers allows management of users, groups, organizational units, and all other AD DS objects of your domain. 
To install Active Directory users and computers you will have to launch the server manager. You can type in "ServerManager.msc" in Run prompt and hit enter(OK).
Under Server manager select Features. The click on Add Features. Add Feature will launch the Add Feature Wizard listing the features to add. 

On Windows Server 2008, under Add Feature Wizard expand 
  • Remote Server Administration Tools
    • Role Administration Tools
      • Active Directory Domain Services Tools 
and then select Active Directory Domain Controller Tools which include Active Directory Users and Computers, Active Directory Domains and Trusts etc...
On Windows Server 2008 R2, under Add Feature Wizard expand
    • Remote Server Administration Tools
      • Role Administration Tools
        • AD DS and AD LDS Tools
          • AD DS Tools
            • AD DS Snap-Ins and Command-Line Tools.
On selecting these features complete the Wizard to install the selected features.

How to start Automatic Windows Update in Windows 7 and 2008 R2

Windows updates keep your computer updated with all latest updates ( defect fixes and features ) available for windows as well as some of the other software. You can enable the automatic windows update so that you don't have to keep track of those. 
Follow below steps to enable automatic windows update:


Open Control Panel from Start Menu. On Control Panel window select "System and Security"  as shown above. On "System and Security" window click "Turn automatic update on or off" link. 


On the Update setting window Select "Install updates automatically" also choose a install update time such that your computer should be up and running with internet connection at that time. So that windows can download and install updates. Click OK and you are done. 


Search Internet from the Start Menu in Windows 7


You might be aware that Windows 7 allow to search for application or file from Start menu itself.  Windows 7 also facilitate you to search the internet.


You can enable this feature using group policy editor. Open a Local Group Policy Editor by typing "gpedit.msc" in Run Command from Start Menu. You can also find the Local Group Policy Editor by searching for "Group Policy" in Start Menu.  

Once Local Group Policy Editor is opened traverse to User Configuration -> Administrative Templates -> Start Menu and Taskbar as shown in below image. 


In the right pane, enable he policy "Add Search Internet link to Start Menu". 


Now go to Start Menu and type what you want to search on internet in Start Menu, start menu will show you the link to search. Once you click the link it will launch the search item as per your computers default web-browser. 


This feature is also supported in Window 2008 operating system. 

How to disable Right Click menu on Windows Desktop

With a simple trick you can disable the Right click menu on the desktop for Windows operating system. This trick works for Windows XP, Windows 7 and Windows 2008 also.


You will need to modify a registry value for this. Before modifying the registry key be sure you are aware of how to modify the registry values. 


Open a registry editor then navigate to "HKEY_CURRENT_USER\software\Microsoft\Windows\CurrentVersion\Policies\Explorer". 

If a DWORD value with name "
NoViewContextMenu" is not present then create a DWORD value having name "NoViewContextMenu". Set its value to 1. 


Setting its value to 1 will not show the context menu on right clicking on Windows  desktop. You can set value to 0 if you want to revert the changes.

To reflect the changes you will need to restart or at least log off your computer. 

You must use the Role Management Tool to install or configure Microsoft .NET Framework 3.5 SP1.

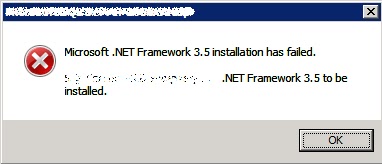
If you are installing a product which requires .Net Framework  3.5 or .Net Framework 3.5 SP1, on Windows 2008 operating system, you may get the error : "You must use the Role Management Tool to install or configure Microsoft .NET Framework 3.5 SP1."


Actual cause of this error is: Your application requires .Net Framework 3.5. It tries to install the .Net Framework but Windows 2008 has already pre-installed .Net Framework. So the Operating system doesn't allow product to install the .Net Framework. It says Use Role Management Tool to enable the .Net Framework which is already installed as a feature. So once you enable the .Net Framework feature using Role Management Tool you will not require to install .Net Framework 3.5.


Follow these steps to enable .Net Framework feature using Role Management Tool:
1. Launch Start Menu. Go to All Programs -> Administrative Tools -> Server Manager. (Alternatively you can launch the server Manager by typing ServerManager.msc at Run prompt.)
2. In the Server Manager console, on the left hand side click on Features. It will show you Features Summary window. 


3. On the right hand side you will find Add Features blue colored link. Click on that. It will launch the Add Features Wizard.
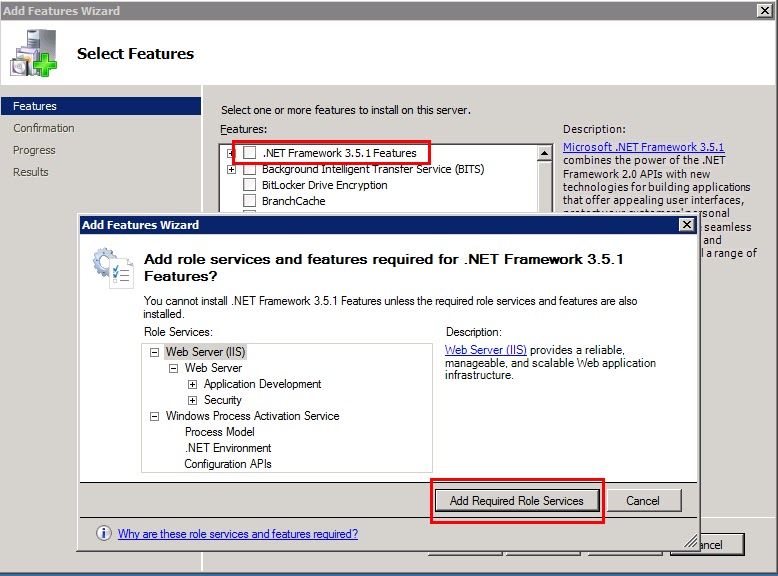
4. On the Add Feature Wizard select .Net Framework 3.5.1 Features. It will launch a dialog for Add role confirmation. Click on Add Required Role Service.


5. Clicking on Next  will take you to Introduction to Web Server(IIS) page, click on Next here.
6. Now on Role Services Page you can select services you want. Don’t click on anything here keep all defaults. Click Next.
7. It will show Install Confirmation page. Click on install and wait till install finishes. It will install the selected features and when if finishes click on close.

Now you can start installation of your product. These steps are verified on Windows 2008 R2 operating system. 

Caching is a technique used to store frequently accessed data in a temporary storage layer to improve system performance and reduce latency....