Showing posts with label Android. Show all posts

How to enable USB debugging on Android devices

USB debugging has a number of uses on Android devices. To enable USB debugging you should first enable Developer options. Developer options have some setting relevant ro advanced users and developers.

Developer options is hidden by default, and can be activated with the following steps:

  • From Settings, select About phone (or About tablet).
  • Tap the Build number entry seven times. On the seventh tap, you will be notified that "You are now a developer."
  • Return to Settings. Developer options should now be visible just above the About phone ( or About tablet).
Now to enable USB debugging click on the Developer options -> USB debugging (Android debugging). Some devices might require Developer options to be on before clicking on USB debugging.


Error: Emulator64-x86 quit unexpectedly

If your MAC is showing crash report with error "Emulator64-x86 quit unexpectedly" while launching the Android emulator, and you have tried other solutions but didn't help then you might want to repair the Disk Permissions for your MAC.

Go to Disk Utility and select disk where mac is running and hit "Repair Disk Permissions". 

The issue might be with the Virtual memory permissions and this could solve the issue.

Errors running builder 'Android Resource Manager' on project 'project name'. java.lang.NullPointerException

You may get the error while compiling the Android app "Errors running builder 'Android Resource Manager' on project 'lock'. java.lang.NullPointerException". You could also get this error while creating a project and you wouldn't be able to create the project altogether.

There could be multiple reasons for the error : 
  • Your project file might be missing
  • The dependent project library might be missing or
  • You might be building an app with Activity but the respective API SDK might not be installed 
If above are not the reasons then you might want to check out this


Copy Files from computer to android device using adb

You can use adb to transfer the files from the computer to your device in cases where you are not able to start the mobile in file transfer mode.

To copy a file from the computer to an android device connected via usb, use this:
adb push "/path/to/local/file" "/mnt/sdcard/path/to/file"

This will copy the local file to the device in the specified location.  Also using adb shell you can create directories or you can also execute some of the shell commands. Once adb is started to launch the adb shell use command 

adb shell

Error : MD5 mismatch! while restoring backup using CWM

Checking MD5 sums... 
MD5 mismatch! 

If you are facing above error while restoring the backup using CMW then you can correct the error easily by using adb shell. 

Connect your mobile to computer and start adb shell else you can use the similar commands on terminal emulator as well. 

adb shell 
# cd /sdcard/clockworkmod/backup/2010-06-29.20.22.53 
# rm nandroid.md5 
# md5sum *img > nandroid.md5 

First traverse to the backup directory for which you are facing the error. Delete the existing md5 sum file( nandroid.md5). Now generate the new md5 sum for all image files in the same directory. And you are done. 

Now try to restore the backup.

ADT or Eclipse with ADT plugin crashes with out of memory error

Android Developer Tools or Eclipse loading ADT plugin may crash with Out of memory exception. Sometimes ADT or Eclipse may also crash while loading any activity layout xml with the errors shown in below images.
PermGen Space errors


Out of memory error


This may happen because you might be having older version of Java SDK installed. Installing the latest version of JDK like 6 or 7 should resolve these errors.

Error: No resource found that matches the given name (at 'theme' with value '@style/Theme.Dialog').

The error occurs because the style element Theme.Dialog is declared under "android:style".

Your ApplicationManifest.xml may contain code as:
    <application
        android:allowBackup="true"
        android:icon="@drawable/ic_launcher"
        android:label="@string/app_name"
        android:theme="@style/Theme.Dialog">

Update the android:theme attribute as given below, the error will get resolved.
    <application
        android:allowBackup="true"
        android:icon="@drawable/ic_launcher"
        android:label="@string/app_name"
        android:theme="@android:style/Theme.Dialog">

Error: "Open quote is expected for attribute "{1}" associated with an element type ...

While developing android applications using eclipse you may get error "Open quote is expected for attribute "{1}" associated with an  element type ...".
This may happen sometimes because you might have by mistake typed closed quote (“) instead of open quote("). Change the quotes at start and end of attribute and you are done.
 

Error: The method loadUrl(String) is undefined for the type Activity

If you are trying to build an Android Application using PhoneGap/Apache Cordova, you may get this error.
The error may occur in two conditions :
  • You have not included the PhoneGap.jar / cordova-2.0.0.jar to your build path. To do so, first copy the jar file to /libs directory under project directory.  Then right click on project directory in eclipse, click "Build Path -> Configure Build Path". Under Java Build Path Select Libraries tab and click on "Add JARs" button. Choose the copied jar file from "lib" directory.  
  • You have not extended your activity from DroidGap. Check the java source file of your project the main activity should be derived from DroidGap as below:
    public class MainActivity extends DroidGap.
This should resolve the error.

Error: Invalid layout param in a LinearLayout: layout_alignParentTop

The error "Invalid layout param in a LinearLayout: layout_alignParentTop or layout_centerHorizontal or layout_centerVertical or layout_alignParentLeft" occurs when you have declared the Linear Layout but included these layout parameters for the button, textview or any other layout element.

Removing these attribute such as "alignParentTop" declared for any of the layout element such as textview or button will resolve the error.

For an example you may get above error if you have declared linear layout as below:

<LinearLayout xmlns:android="http://schemas.android.com/apk/res/android"
    xmlns:tools="http://schemas.android.com/tools"
    android:layout_width="match_parent"
    android:layout_height="match_parent" >
    <TextView
        android:id="@+id/textView1"
        android:layout_width="wrap_content"
        android:layout_height="wrap_content"
        android:layout_alignParentLeft="true"
        android:layout_alignParentTop="true"
        android:layout_marginLeft="34dp"
        android:layout_marginTop="61dp"
        android:text="@string/hello_world" />
</LinearLayout>

To resolve the error remove lines marked in red.

How to access files on Android Mobile to Ubuntu/Linux

Connect your Android mobile to the computer. If the connection is detected by mobile then change the USB connection setting on phone to "Mass storage". Even after this if you are not able to access the files on your Ubuntu, follow below steps.
  1. Connect your mobile using USB cable.
  2. Execute "lsusb" command on terminal as  : $ sudo lsusb
  3. In the output displayed by lsusb command check if your mobile device is listed or not. Ideally it should be displayed with your mobile device vendor ( LG, Samsung, HTC etc...) or with Google Inc. name.
  4. If you are able to locate the device in the list then unplug the device from computer.
  5. Now install the newest Version of "libmtp" by following steps mentioned in the post http://www.humans-enabled.com/2011/12/how-to-fix-samsung-galaxy-nexus-mtp.html
  6. Once you have installed "libmtp", you can connect your device and use gMTP to view the files on device.

Error: command failure: partition download failed

This post is for those who are trying to flash ClockworkMod using NVFlash or OneClickRecoveryFlasher or manually using command prompt on LG Optimus 2X or T-Mobile G2X. 
Carefully looking at the error you can recognize that error is about the partition failure, it means command failed to recognize/find the partition you have specified in the command.  If you are using OneClickRecoveryFlasher you may find the FlashCWMRecoveryXXXX.cmd file which will contain the commands that I am talking about.
The partition number is mentioned after the --download flag. As marked in red in below command :

nvflash.exe --bct E1108_Hynix_512MB_H8TBR00U0MLR-0DM_300MHz_final_emmc_x8.bct --bl fastboot.bin --download 5 recovery-clockwork-5.0.2.0-p999.img

In order to resolver the error the partition number must be correct. 
In case if your trying to flash the recovery in T-Mobile G2X use partition number as 5. 
In case if your trying to flash the recovery in  LG Optimus 2X use partition number as 14. 

How to install Custom ICS (Android 4.0) ROM on LG Optimus 2x (P990)

I WILL NOT BE HELD RESPONSIBLE FOR ANY DAMAGE CAUSED BEFORE, DURING, AND/OR AFTER INSTALLING CUSTOM ROM. PLEASE READ EVERYTHING, MAKE BACKUPS, AND FLASH AT YOUR OWN RISK.
 
With the help of ROM Manager application you can easily upgrade your LG Optimus 2X (LGP 990) with ICS 4.0.4 custom ROM. 
For this you will have to first ROOT your device. To know how to root your LG Optimus 2X click here. Then install a free ROM Manager application available in Googly Play market. 
Now download the custom ROM that you want to install/apply. Copy the custom ROM to your internal memory of LG Optimus 2X (LGP 990), you can even copy the ROM to external SD card as well.  Now follow below mentioned steps to apply the custom ROM.


1. Launch the ROM Manager application, you will see the UI as below:
2. Click OK. Firstly you should backup your current ROM. You can have backup in two forms with Data and only ROM. You should take backup in both the form so that you can at least return to old ROM if something goes wrong. 
3. Once you have backup of your current ROM. Now launch the ROM Manager again. Now select install ROM from SD card option. 
4.Before you install new ROM you should wipe the cache and data partition depending upon compatibility with your current partition. Ideally flashing data and cache partition is good option.
Now selected ROM will get updated.

Some of the custom ROM's can be downloaded from below links :
  

Android - Can't create new v4.0 AVD

While creating Android 4.0 or later if you are facing error : "Unable to find a 'userdata.img' file for ABI armeabi to copy into the AVD folder." please go through this post.

Eclipse - Cannot Create Android 4.0 Virtual Device

While creating Android 4.0 or later if you are facing error : "Unable to find a 'userdata.img' file for ABI armeabi to copy into the AVD folder." please go through this post.

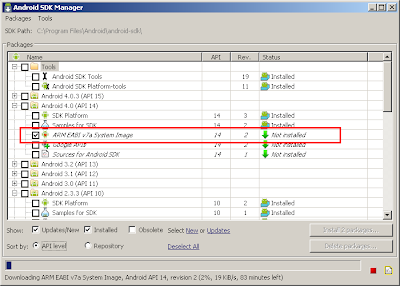
Unable to find a 'userdata.img' file for ABI armeabi to copy into the AVD folder

While working with Android 4.0 and later you may face this error. This error appears when you try to create the AVD for Android 4.0 or later. 
Root cause of the error is that you have not downloaded the "ARM EABI v7a System Image" while downloading the Android SDK. 


In order to resolve the error, launch the Android SDK manager. Install the "ARM EABI System Image" for the Android version that you are using. 
Once the "ARM EABI System Image" is installed, go ahead and create the AVD.

Error: Intent, View cannot be resolved to a type.

You may get this error during compilation of the Android project if you have declared/used a Intent variable in your code. The error appears because the Intent type is unknown to compiler, I mean you have not included a library which describes the Intent type. 


Resolution: 
In order to resolve the error include following line in our project 
    import android.content.Intent;


Including the above line will cause compiler to search the Indent definition which is declared in android.content.Indent package.
You may also get "Error: View cannot be resolved to a type" if you have used View object in your code.  To resolve view related error "import android.view.View;" in your code.


Error : Move 'classname.java' to the default package.

During development of android application using eclipse you may get this error. 
Cause of this error is the class which you have declared with "classname" is not included in any of the package. 


Resolution: 
In order to resolve this error the newly declared class should be included in your application specific package or under default package. Default package is your application default package. 
Just add a line "package packagename;" at the top of your "calssname.java" file, will resolve the error.


Click on the error icon shown in the eclipse editor, it will show you two options either to move class in your application specific package or to move in default package.


A Java package is a mechanism for organizing Java classes into namespaces. Packages are typically used to organize classes belonging to the same category or providing similar functionality. Java packages can be stored in compressed files called JAR files, allowing classes to download faster as a group rather than one at a time.

Error: This text field does not specify an inputType or a hint

If you have used EditText field in your android project you may get this error. EditText support multiple input type hence the error. 
E.g: You will get this error if you declare EditText as below:


    <EditText
        android:id="@+id/editText1"
        android:layout_width="match_parent"
        android:layout_height="wrap_content"
        android:ems="10" >
        <requestFocus />
    </EditText>

Resolution: Include input type in the edittext field as below 

    <EditText
        android:id="@+id/editText1"
        android:layout_width="match_parent"
        android:layout_height="wrap_content"
        android:ems="10"
        android:inputType="text" >
        <requestFocus />

    </EditText>
 

Warning : Hardcoded string "str", should use @string resource

Eclipse sometimes show a warning "Hardcoded string "str", should use @string resource.", while compiling an Android project. 
E.g: you might have used text view as below, and set the text directly in the layout xml


    <TextView
        android:id="@+id/textView1"
        android:layout_width="wrap_content"
        android:layout_height="wrap_content"
        android:text="This is text View" />

Resolution: Declare the string resource in strings.xml, present under values folder. Use the variable instead of the value that you have set.   


E.g.: for above text view declare string resource  as below :
 <string name="info">
This is text View
</string>


and update the text view as below:

    <TextView
        android:id="@+id/textView1"
        android:layout_width="wrap_content"
        android:layout_height="wrap_content"
        android:text="@string/info" />

Caching is a technique used to store frequently accessed data in a temporary storage layer to improve system performance and reduce latency....