- Rename the older Windows installation folder to Windows.old
- Now run the disk clean up by right clicking the drive where the old Windows folder exists.
- During disk cleanup select clear system files.
- Now it will detect that there is old Windows folder which can be cleaned.
- Select the Older Windows installation files and complete the disk clean up.
- The Windows.old folder will get deleted automatically.
Showing posts with label Windows. Show all posts
Showing posts with label Windows. Show all posts
How to delete old Windows installation folder
To delete the older Windows installation folder you will have to let windows know that its older installation and clean it using disk cleanup.

Error : "The local policy of this system does not permit you to logon interactively" during RDC
If you are trying to use the Remote Desktop Connection tool to connect to your another system you may receive the following error message: “The local policy of this system does not permit you to logon interactively.”
All the below mention procedure needs to be carried out on the Remote Machine that you are trying to connect using Remote Desktop Connection tool. Also in order to perform below steps you will require administrative rights on the remote machine.
All the below mention procedure needs to be carried out on the Remote Machine that you are trying to connect using Remote Desktop Connection tool. Also in order to perform below steps you will require administrative rights on the remote machine.
To resolve this issue, add user with which you are trying to connect to the Remote Desktop Users group:
- Click Start, point to Settings, and then click Control Panel.
- Double-click System, and then on the Remote tab, click Select Remote Users.
- Click Add type in the user account name, and then click OK.
Also, make sure that the Remote Desktop Users group has sufficient permissions to log on through Terminal Services. To check this, follow these steps:
- Click Start, click Run, type secpol.msc, and then click OK.
- Expand Local Policies, and then click User Rights Assignment.
- In the right pane, double-click Allow logon through Terminal Services. Make sure that the Remote Desktop Users group is listed.
- Click OK.
- In the right pane, double-click Deny logon through Terminal Services. Make sure that the Remote Desktop Users group is not listed, and then click OK. Also make sure that Group "Everyone" is not present in the list. If Group "Everyone" is listed then select the group and Click Remove. Now Click Apply and OK.
- Close the Local Security Settings snap-in.
Error: "The server is not operational"
If you face an issue "The server is not operational" while executing Active directory queries or using tool which connect to Active Directory, you will need to check the connectivity with the active directory.
In order to resolve the issue follow the steps mentioned in the KB article http://support.microsoft.com/kb/325322
If still issue persist you will need to check domain DNS entries. Check if forward and reverse look-up entries are populated correctly, for the active directory domain you are trying to connect.
If above steps does not resolve the issue and if you programatically connecting to active directory then try to use cached connections for the different queries.
In order to resolve the issue follow the steps mentioned in the KB article http://support.microsoft.com/kb/325322
If still issue persist you will need to check domain DNS entries. Check if forward and reverse look-up entries are populated correctly, for the active directory domain you are trying to connect.
If above steps does not resolve the issue and if you programatically connecting to active directory then try to use cached connections for the different queries.
How to delete files so that they can not be recovered
Once you delete a file in Windows operating system, the index of the file is removed so that you will not be able to access the file contents. But if you use the recovery tools the files can be recovered if file is not overwritten by other files.
Sysinternals has released a tool named SDelete with which you can use to overwrite the contents of the files that you have deleted. In turn SDelete overwrite the contents of free space on your disk drive. You can download SDelete from Sysinternal.
SDelete is command line utility. You can use SDelete to remove deleted file contents from C drive using following command:
SDelete -z C
Sysinternals has released a tool named SDelete with which you can use to overwrite the contents of the files that you have deleted. In turn SDelete overwrite the contents of free space on your disk drive. You can download SDelete from Sysinternal.
SDelete is command line utility. You can use SDelete to remove deleted file contents from C drive using following command:
SDelete -z C
How to create shutdown shortcut for Windows
Sometimes its better to have shutdown shortcut handy, if you want to shutdown your computer number of times.
Its easy to create the shutdown shortcut on desktop. You just have to create new file in notepad. Type in the following command in file:
shutdown -s -t 00
save the file on desktop with name ShutdownShortcut. If you see the file on desktop it will have extension ".txt", change it to ".bat".
Now your shortcut for shutdown is ready. Just double click the bat file and your computer will start shutdown immediately.
If you don't like to click the mouse for shutdown you can have a keyboard shortcut for this command as well.
Just create a shortcut for the "ShutdownShortcut.bat" on desktop. Right click the shortcut created and select properties.
As shown in below image click on Shortcut key, then press any key you would like to have shortcut key for Shutdown. Click Apply and Ok.

Its easy to create the shutdown shortcut on desktop. You just have to create new file in notepad. Type in the following command in file:
shutdown -s -t 00
save the file on desktop with name ShutdownShortcut. If you see the file on desktop it will have extension ".txt", change it to ".bat".
Now your shortcut for shutdown is ready. Just double click the bat file and your computer will start shutdown immediately.
If you don't like to click the mouse for shutdown you can have a keyboard shortcut for this command as well.
Just create a shortcut for the "ShutdownShortcut.bat" on desktop. Right click the shortcut created and select properties.
As shown in below image click on Shortcut key, then press any key you would like to have shortcut key for Shutdown. Click Apply and Ok.
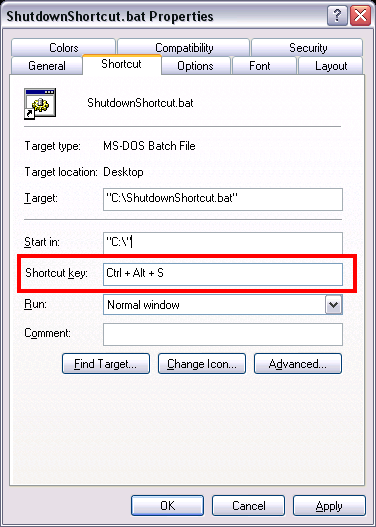
Now whenever you will press the "Ctrl +Alt + Selected Key" your computer will start shutdown.
How to Check If My Processor is x86 (32-bit) or x64 (64-bit) in Windows?
There are many ways of checking if your processor is 64 bit or 32 bit on windows platform.
I will be discussing the simplest and easy method which is full proof.
Just open Command prompt and type
SYSTEMINFO
( command is not case sensitive), within a minute command prompt will be full with of information. you just have to search for "System Type :" This row will tell you your processor type as shown in below image.

I will be discussing the simplest and easy method which is full proof.
Just open Command prompt and type
SYSTEMINFO
( command is not case sensitive), within a minute command prompt will be full with of information. you just have to search for "System Type :" This row will tell you your processor type as shown in below image.

Hiding "Run Command" from Start Menu
The Windows Start Menu contains many options. Usually every one does not require these menu items.
You can easily get rid of some of the items from Start Menu, such as Run command, Control Pane, My Documents, Printer and Fax etc...
To remove items from Start Menu

You can easily get rid of some of the items from Start Menu, such as Run command, Control Pane, My Documents, Printer and Fax etc...
To remove items from Start Menu

- Right click on Taskbar, select "Properties".
- In Taskbar properties dialog, Select "Start Menu" tab.
- On Start Menu tab select the customize button.
- On Window 7 you will get directly start menu customization options, on Windows XP, you will need to select Advanced tab.
- Here you will see the items displayed in Start Menu, deselect the items that you dont want to see on Start Menu.
- Press Apply and OK, you are done.
Hiding the Drive from others
With a simple technique you can hide a drive from other. Just be sure that before hiding the drive, there should not be any files in use else you would not be able to hide the drive. Also keep in mind that you would not be able to hide system drive.
- Open the computer management console. You can open this from ( For Windows XP) control panel -> Performance and Maintenance -> Administrative Tools -> Computer Management. ( For Windows 7) control panel -> System and Security -> Administrative Tools -> Computer Management.
- Else you can execute command "compmgmt.msc" from Run or command prompt.
- In the computer management console, on the left hand side select Storage -> Disk Management.
- Selecting Disk Management will show you, the disk drives present on your computer, it will also list your other drives such as CD Drive, floppy drive if any.
- The choose any drive you want to hide, and right click on that.
- On the context menu select "Change Drive Letter and Path", which will launch the dialog box where you can change or remove drive letter.
- On the "Change Drive Letter Path" drive click "Remove" button.
- It will launch the confirmation dialog, say yes there and you are done.


Now launch the my computer, you will not find your hidden drive there.
How to use Remote Desktop Connection
Remote Desktop facilitates you to access a remote computer from any other computer. This means, for example, that you can connect to your work computer from home and have access to all of your applications, files, and network resources as though you were in front of your computer at work.
Remote Desktop also allows more than one user to have active sessions on a single computer.
To enable remote desktop on your computer follow these steps :
Remote Desktop also allows more than one user to have active sessions on a single computer.
To enable remote desktop on your computer follow these steps :
- Right click "My Computer" icon on desktop or start menu.
- Select properties, it will show you the system properties. Alternately you can launch this by pressing "Windows + Pause Break" key on keyboard.
- Now on the System Properties dialog box, select the "Remote" Tab.
- Now select the check box "Allow user to connect...". As shown in above figure.

Now you are ready to connect this computer from any computer, for this you should know the IP address of the computer.
To connect your remote desktop enabled computer from any other computer, go to Start, select Run, in Run dialog type "mstsc" click OK.
This will launch Remote Desktop Connection dialog, here type the IP Address of your remote computer, and press OK, withing some moment you will prompt for user name and password, input the user name and password and you are done. It will connect to remote computer if its accessible on network. Then you are ready to use your remote computer as if you are working on it directly.
But be sure that firewall is disable or you have added the remote desktop to firewall extension, after enabling the remote desktop on remote computer.
Modifying System Startup: To load selective startup
If your windows operating system is booting/running slow, then more number of unwanted program loading at startup might be one of the reason behind this.
You can load the selective startup, so that required programs only get loaded. Follow below steps to do this.
Caution: Be sure that which programs you are going to remove from startup, because if you de-select programs such as device driver or any of the required services then the operating system might not function correctly.
1. Click Start, select Run.
2. Type msconfig. Click OK. This will launch dialog as below.

3. Under startup selection click on Selective Startup.
4. Then Select Startup tab.

5. There you will find the programs that are going to be loaded at startup.
6. By unselecting them, they will not load during startup.
7. Click Apply then OK.
8. It will show message box as below.
 9. Here click restart if you want to restart.
You can load the selective startup, so that required programs only get loaded. Follow below steps to do this.
Caution: Be sure that which programs you are going to remove from startup, because if you de-select programs such as device driver or any of the required services then the operating system might not function correctly.
1. Click Start, select Run.
2. Type msconfig. Click OK. This will launch dialog as below.

3. Under startup selection click on Selective Startup.
4. Then Select Startup tab.

5. There you will find the programs that are going to be loaded at startup.
6. By unselecting them, they will not load during startup.
7. Click Apply then OK.
8. It will show message box as below.

Launching any application just a key away
Using keyboards with lots of keyboards short know makes life more easier in day to day life. Also if you have shortcut keys to launch an application it helps a lot.
Today I am going to tell you a simple technique that many people might be knowing but might not be using fully.
You can launch any application from anywhere just by pressing some key combinations. To do this you have to do following things:
- Create a shortcut of any application on the desktop. You can do this by Right Click on application icon, under “Send To” select Desktop( create shortcut).
- Now come back to your desktop.
- Select the shortcut icon created in step 1.
- Right Click -> Select Properties.
- On properties dialog you will find Shortcut Tab.
- On Shortcut Tab, click in front of Shortcut Key textbox.
- Now Press any key you want to be your shortcut for this application.
- By default it will show you Ctrl + Alt .
- Now Ctrl + Alt + < pressed key> becomes your shortcut key for launching your application.
Using this technique you will end up having many shortcuts on desktop. If you don't want your desktop to be cluttered, you can just right click on desktop and uncheck "Show Desktop Icons" option under Arrange Icons By" menu.
Note: If you are using some application which uses the same shortcut key then your application may not launch. In such situations. Minimize the application that you are currently using then press the shortcut key combination.
Creating new commands on your windows machine
Many a times we execute some commands repeatedly, which leads in waste of some time. Also some times you many want to create some commands and execute those directly instead of traversing to that directory and executing.
In such situation you can create a simple batch file which will contain your commands or path of executable which you want to execute in bunch. After that your work will be just to execute that batch file.
To create your own commands follow these steps:
In such situation you can create a simple batch file which will contain your commands or path of executable which you want to execute in bunch. After that your work will be just to execute that batch file.
To create your own commands follow these steps:
- Create a batch file containing your path of executable or commands you want to execute.
- Place all these file at
- Now go to Run prompt and just type name of your batch file.
If you don't want to risk your Windows directory, then you can do do following things, but please do these steps carefully:
- Create a batch file containing your path of executable or commands you want to execute.
- Place all these file at single directory on any drive.
- Right click to My Computer, Click on Properties.
- On System Properties dialog, open Advanced Tab.
- Click on Environment Variables button.
- Under System Variables group, select Path environment variable. Click on Edit button.
- At the end of the value of variable place a semicolan and above directory path(step 2).
- Please insure that you are just to appending to current path not overriding. Modifying current path will make harm to your computer.
- Thats it and you are done.
How to execute application or batch file at startup
You have multiple options for doing this:
Option 1:
Option 1:
- Create a shortcut of you application or batch file.
- Copy that shortcut to "C:\Documents and Settings\
\Start Menu\Programs\Startup" folder. (Note : - Now on the next log-on your application or batch file will execute.
- You can create a registry key under HKEY_LOCAL_MACHINE\SOFTWARE\Microsoft\Windows\CurrentVersion\Run with the name of the application you want to execute, of type REG_SZ.
- Set the path of executable as a value of the key created.
- Append " /STARTUP" at the end of value and you are done.
The process cannot access the file because it is being used by another process
Sometimes during install of some product you may face the error “The process cannot access the file because it is being used by another process” and your installation fails. In such situation you can do following things to eliminate the error:
1. Check the log created by the product installer. Usually they are located in the temp directory. Log file may tell you which file is used by other process. Using Process Explorer(Tool from Sysinternals) you can check that the file is used by which process. Then close that process and start your installation.
2. If you are installing using shared folder from remote machine as media, then check if_ISDel.exe is running. If it’s running then kill that process using task manager. Sometimes this helps.
Some useful windows Commands
Following are some useful commands that you can execute through the Run prompt on your windows machine.
- Open Control Panel : control
- Open Add Remove programs panel from control panel : appwiz.cpl
- Open Power option properties : powercfg.cpl
- Open system configuration utility: msconfig
- Open Computer Management console : compmgmt.msc
- Open Local Security Settings console: secpol.msc
- Open Group Policy editor: gpedit.msc
- Open Windows Firewall Settings dialog: firewall.cpl
- Open Registry editor: regedit or regedit32.exe
- Open System Properties dialog: sysdm.cpl (Keyboard Shortcut: Start(windows) + Pause Break) you can also the command "Control.exe system"
- Open About Windows dialog box/ To view windows version: winver
- Open Network Connections window : ncpa.cpl
- Open Windows Task Manager : taskmgr.exe (Keyboard Shortcut: Ctrl + Shift + Esc)
- For Eject Drive or Safely Remove Hardware : RunDll32.exe shell32.dll,Control_RunDLL hotplug.dll
- To Open Sound and Audio Device properties dialog: mmsys.cp
- Open Service Manager: services.msc (You can connect to local or remote service manager and view\change services properties.)
- Open Active Directory Users and Computer Console: dsa.msc (Note: You should have administrative tools installed and you should able to connect domain controller)
- Open Microsoft Management Console: mmc (Note:You can add different snap-ins in MMC console)
- Open Active Directory Domain and Trust management console: domain.msc (Note: You should have administrative tools installed and you should able to connect domain controller)
- Open internet explorer: iexplore, chrome (for chrome), firefox ( for Firefox).
- To view internet options : inetcpl.cpl
Feel free to share commands that you know or if these does not work on particular operating system, I have tried these on Windows XP.
Subscribe to:
Posts (Atom)